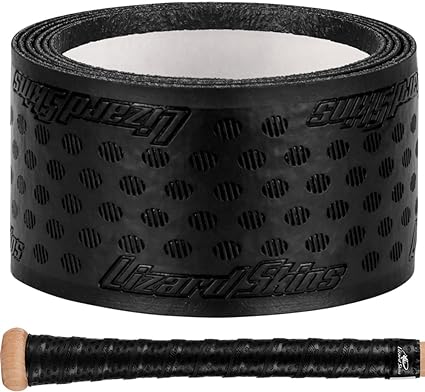
Are you looking to add some extra grip and style to your baseball bat? Look no further than a lizard skin bat grip. These grips are made from high-quality materials and provide excellent traction for a more secure grip on the bat. In this article, we will guide you through the steps to properly install a lizard skin bat grip on your baseball bat.
First, it’s important to choose the right size grip for your bat. Lizard skin bat grips come in various thicknesses and lengths, so make sure to measure your bat’s handle before purchasing a grip. Once you have the right size, you can start the installation process. It’s a simple and straightforward process that can be done in just a few minutes with the right tools. Follow our step-by-step guide to ensure a perfect installation every time.
Understanding Lizard Skin Bat Grip
When it comes to choosing a bat grip, Lizard Skin is a popular choice among baseball and softball players. This type of grip is made from high-quality materials and provides a comfortable, non-slip surface for your hands while you’re at bat.
Installing a Lizard Skin bat grip is a straightforward process that can be done at home with a few simple tools. Before you get started, it’s important to understand the different types of Lizard Skin bat grips available and how to choose the right one for your needs.
Lizard Skin bat grips come in a variety of colors and thicknesses. The thickness you choose will depend on your personal preference and the size of your hands. Thicker grips provide more cushioning, while thinner grips offer a better feel for the bat.
To install a Lizard Skin bat grip, you’ll need a few basic tools, including a razor blade, scissors, and adhesive spray. It’s also helpful to have a clean, dry surface to work on and a pair of gloves to protect your hands from the adhesive.
Once you have your tools and materials ready, you can begin the installation process. Start by removing any existing grip tape from your bat and cleaning the surface with rubbing alcohol. Next, measure and cut your Lizard Skin bat grip to the appropriate length.
Apply adhesive spray to the bat handle and the back of the grip, then carefully wrap the grip around the bat, smoothing out any wrinkles or bubbles as you go. Use a razor blade to trim any excess grip at the end of the bat.
With a little practice, installing a Lizard Skin bat grip can be a quick and easy process. By choosing the right thickness and color for your needs, you can improve your grip and comfort at the plate, helping you perform at your best.
Preparation for Installation
Before you begin installing your lizard skin bat grip, you need to make sure you have all the necessary tools and materials. Here’s what you’ll need:
- Lizard skin bat grip
- Rubbing alcohol
- Clean cloth
- Scissors
- Adhesive spray (optional)
First, clean your bat handle with rubbing alcohol and a clean cloth. This will remove any dirt or oils that may interfere with the grip’s adhesive. Make sure the handle is completely dry before moving on to the next step.
Next, lay out your lizard skin bat grip. Take note of the orientation of the grip and the location of the logo, if there is one. You want to make sure the grip is facing the right way before you start wrapping it around the handle.
If the grip is longer than your bat handle, use scissors to trim off the excess. Be careful not to cut too much off, as you want the grip to cover the entire handle.
If you want to ensure a more secure grip, you can apply adhesive spray to the bat handle before wrapping the grip around it. This is optional, but can help prevent the grip from slipping during use.
Once you have everything prepared, you’re ready to start installing your lizard skin bat grip.

Step-by-Step Installation Guide
Installing a lizard skin bat grip is an easy process that can be done by anyone. Here is a step-by-step guide on how to install a lizard skin bat grip:
Unwrapping the Grip
The first step is to unwrap the grip from its packaging. Make sure to remove all the stickers and tags from the grip. Then, lay the grip flat on a clean surface and let it sit for a few minutes to allow it to warm up to room temperature. This will make it easier to apply.
Applying the Grip
The next step is to apply the grip to the bat. Start by peeling off the backing tape from one end of the grip. Then, align the grip with the top of the bat handle and wrap it around the handle in a spiral motion. Make sure to keep the grip tight and smooth as you wrap it around the handle. Continue wrapping until you reach the end of the handle.
Securing the Grip
The final step is to secure the grip in place. Use the provided finishing tape to wrap around the end of the grip. This will prevent the grip from unraveling over time. Make sure to wrap the finishing tape tightly and smoothly around the end of the grip. Once you have finished wrapping, cut off any excess tape with a pair of scissors.
Congratulations! You have successfully installed a lizard skin bat grip on your bat. Enjoy the improved grip and comfort that it provides.
Tips for Left-Handed Batters
If you are a left-handed batter, applying a lizard skin bat grip can be a bit tricky. However, with the right technique and a bit of practice, you can easily apply the grip to your bat. Here are some tips to help you get started:
-
Reverse the instructions: Most instructions for applying a lizard skin bat grip are written for right-handed batters. As a left-handed batter, you will need to reverse the instructions. For example, if the instructions say to start at the top of the bat and wrap the grip towards the bottom, you will need to start at the bottom and wrap it towards the top.
-
Use your non-dominant hand: Since you are a left-handed batter, your right hand is your non-dominant hand. Use this hand to hold the grip in place as you wrap it around the bat. This will give you more control over the grip and ensure that it is applied evenly.
-
Take your time: Applying a lizard skin bat grip can be a bit time-consuming, especially if you are doing it for the first time. Take your time and make sure that each wrap is tight and even. This will ensure that the grip stays in place and provides you with a comfortable and secure grip on your bat.
-
Practice: The more you practice applying a lizard skin bat grip, the easier it will become. Try practicing on an old bat or a practice bat before applying the grip to your game bat. This will give you a chance to perfect your technique and ensure that you get the best possible results.
By following these tips, you can easily apply a lizard skin bat grip to your bat and enjoy the benefits of a comfortable and secure grip.
Common Mistakes to Avoid
Putting on a lizard skin bat grip may seem like a simple task, but there are some common mistakes that can make the process more difficult than it needs to be. Here are a few things to keep in mind to avoid making these mistakes:
-
Not cleaning the bat handle: Before applying the grip, make sure to clean the bat handle thoroughly. Any dirt, sweat, or residue can prevent the grip from adhering properly. Use a damp cloth to wipe down the handle and let it dry completely before applying the grip.
-
Stretching the grip too much: Lizard skin bat grips are designed to stretch slightly, but stretching it too much can cause it to tear or become misshapen. Be careful not to overstretch the grip when applying it to the bat handle.
-
Starting in the wrong place: It’s important to start applying the grip in the right place on the bat handle. If you start too close to the knob or too far up the barrel, it can make it difficult to get a good grip on the bat. Follow the instructions carefully to make sure you start in the right place.
-
Not smoothing out air bubbles: When applying the grip, it’s common to get air bubbles trapped underneath. Make sure to smooth out any air bubbles as you go along to avoid a lumpy or uneven grip.
-
Not cutting the grip properly: Lizard skin bat grips come in a standard length, so you may need to cut it to fit your bat handle. Be careful not to cut too much or too little, as this can affect the grip’s performance. Follow the instructions carefully and use a sharp pair of scissors to make a clean cut.
By avoiding these common mistakes, you can ensure that your lizard skin bat grip is applied correctly and provides you with the grip and comfort you need at the plate.
Conclusion
Congratulations! You have successfully put on a lizard skin bat grip. It may have taken some time and effort, but the end result is worth it. You now have a bat that not only looks cool but also provides a better grip and feel.
Remember, the key to a successful installation is preparation. Make sure your bat is clean and dry, and that you have all the necessary tools and materials. Take your time and follow the instructions carefully, and you’ll be swinging your new grip in no time.
If you encounter any issues or have any questions, don’t hesitate to reach out to the manufacturer or a professional. They can provide additional guidance and support to ensure a successful installation.
Keep in mind that a lizard skin bat grip is not a magic solution to all your hitting woes. It can certainly help with grip and comfort, but it won’t automatically turn you into a home run hitter. Practice and hard work are still the keys to success on the diamond.
Overall, putting on a lizard skin bat grip is a simple and rewarding process. With a little bit of patience and effort, you can give your bat a fresh new look and feel. Happy hitting!


